
Do delivery delays, missed reviews, and duplicate work sound familiar to you? These are not problems with your business’s or employees’ productivity. These are issues with the processes. So, once you get to the bottom of that, you will easily find the source of the problem and get rid of it or do something to streamline the workflow.
Process mapping is one of the methods you can use to make a proper blueprint of the process with common or standard symbols that everyone can easily understand. What process maps do is convert detailed process explanations to concise charts with only the important attributes.
So, in today’s blog, we will tell you how to create these very useful blueprints to ensure that your processes go smoothly and somewhat uninterrupted, and more. With that out of our way, let’s get started right away with it.

What is Process Mapping?
Making a process map is to visually blueprint workflows and processes. This is also called a flowchart, workflow diagram, or workflow diagram.
The purpose is to communicate how it works simply and transparently. An advantage is that it will save your breath and your time, as you can simply share the process map with everyone involved in the process or workflow. Another advantage is that it helps easily identify what’s working and what’s not.
Some examples of processes include:
- Onboarding new employees
- Solving recurring issues
- Documenting complex workflows
- Clarifying responsibilities
Some examples of process map types include:
- Flowchart
- Detailed process map
- Document map
- High-level process map
- Rendered process map
- Swimlane
- Value chain analysis
- Value stream map
- Flow diagram
- Process flowchart
- Process model
- Workflow diagram
Read Also: Virtual Meeting Etiquette: Best Practices & Tips
Steps to Create a Process Map
Here’s how to create a process map using pen and paper or a whiteboard. You can also use the best workflow app with templates. However, knowing the process from the bottom up provides you with control at each step.
1. Identify the Process
The first step is to always know where to start. So, what we need to do is pick a particular process to map. It can be anything messy, confusing, new, unclear, or inefficient.
2. List the Activities
Jot/Write down every task in the process without worrying about the order. Remember to list all the inputs, actions, and HR responsible. It is crucial to work with everyone involved, as they will assist you in spotting essential subprocesses and deciding the amount of detail to include. Also, don’t forget to mark the start and end points so that everyone knows:
- The process’s beginning
- The desired output it must produce.
3. Sequence the Steps
Next, we will use our process mapping tools to sequence all the steps in order. Double-checking the process to include any steps that you might have missed is wiser than not doing it and regretting it later. This brings the entire workflow into the frame.
4. Make a Flowchart
It’s crucial to select the format that fits best. This depends on the level of detail and the process category. Overall, it’s up to your wisdom not to make a basic flowchart for a medical app development process.
5. Finalize & share
Now, we must bring everyone involved in the workflow or process together to review the workflow process map. It’s best to ask:
- Whether there are any missing steps or not
- Whether any tasks are repeated or not
- Whether anything is unclear or we have nailed it.
This is your last chance to fix any mistakes. Moreover, when everything is done, share the final version with everyone who requires it.
6. Analyze & Improve
What you have now will represent the current state of the process. A few final checks include improving the process, identifying obstacles, unnecessary steps, and inefficiencies. Asking your team where they get stuck or confused always helps. Also, your new process map after improvement must reflect the changes.
Why Must You Use a Process Map?
Make your workday more productive
Time tracking and work management can help you reach your goals
faster.
There are many other tools and techniques to clarify workflows, so why are tools for process mapping one of the most commonly used? One reason is that they help you easily:
- Find inefficiencies
- Simplify ideas
- Plan for what-ifs
- Clarify roles
- Document processes
- Clear communication
- Faster decision-making
- Support your team
- Stay compliant

Benefits of Process Mapping
Regardless of the type of process you have, process mapping will always work with it. It’s a standardized method after all. Moreover, here are some other reasons why you need to make process maps for workflows.
- Better enablement of scenario tests and assessments
- Increased standardization and awareness of responsibilities and roles
- Simpler identification of a process’s vulnerable aspects
- Employee satisfaction and efficient team performance
- Shorter learning curves for trainees
Another way to streamline workflows will be to use the best time tracking software.
Types of Process Maps
Depending on the level of detail and the type of process involved, you must choose one of the standardized process maps available:
1. Flowchart
The good old basic flowcharts for your basic workflows, projects, and processes. These are simple yet effective, with only a few standard symbols to remember. For example, using them for designing a database schema layout is a good idea.
2. High-Level Map
These are also known as top-down or value chain maps. These charts provide you with a bird’s-eye view of a process, skipping the details and focusing on the key stages.
3. Detailed Map
This process map has everything, including actions, decisions, subprocesses, inputs, outputs, metrics, and contingencies. It transparently marks decision points and shows who’s responsible for what.
4. Swimlane Map
Also known as a cross-functional flowchart, it organizes the process by splitting responsibilities into vertical and horizontal lanes, representing persons, roles, and teams.
5. Value Stream Map
This is one of the lean tools for process mapping that tracks the whole journey of a product or service from start to finish. Here, you will find a special set of mapping symbols to show how information and materials move through each step. It’s a good way to record metrics and data, such as cycle time, the people involved, and where time is wasted or the project gets delayed.
6. SIPOC Diagram
First, we will expand it to suppliers, inputs, processes, outputs, and customers. As the name suggests, the SIPOC diagram is a structured chart providing a high-level view of the workflow before building a process map.
7. BPMN
This one is a standardized way of business process mapping. It helps you align your technical and other teams by showing how tasks, events, and decisions flow.
8. Rendered Map
A rendered process map represents the current or future state process to signal the potential areas of improvement.
Read Also: All You Need to Know About the Sunk Cost Fallacy
Essential Process Mapping Symbols You Must Know About
As we mentioned before, process mapping involves various standardized symbols. These are 30 unique shapes in total. However, only 10 of them are commonly used:
| Symbol | Shape | Usage |
| Terminator | Oval | Mark a process’s start and end |
| Process step | Rectangle | Show a specific task or action in the workflow |
| Flow | Arrow | Connect the steps and show the work movement direction |
| Decision | Diamond | Signal a decision point with multiple options |
| Delay | D shape | Show where a pause or delay happens in a process |
| Document | Rectangle with a wavy bottom | Represent a readable file or document. |
| Multiple documents | Stacked rectangles with wavy bottoms | Represent readable files and documents |
| Data | Parralelogram | Represent data flowing in and out of a process step |
| Manual input | Rectangle with a slanted top | Show a step where someone has to input manual data. |
| Subprocess | Rectangle with double vertical lines | Show a predefined process that happens somewhere else |
Real-Life Example of a Process Map
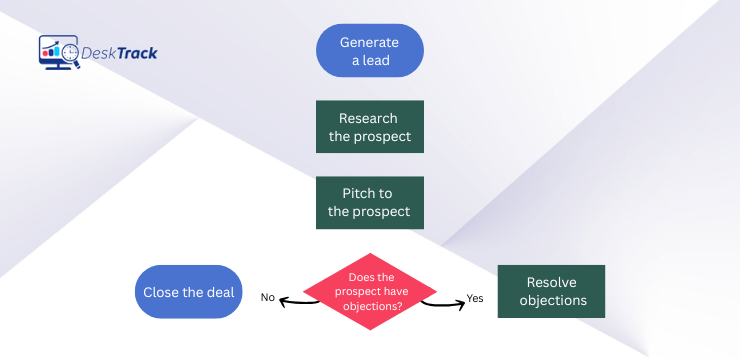
The best part about it is that you can create a process map for any kind of process, be it at a professional or personal level. To give you a better idea of what one might look like, here’s a practical example of its use in the B2B sales process.

Tips for Effective Process Mapping for Your Projects
We tried and tested every one of these process mapping tips and best practices to help you take yours to the next level:
- Define the process start and end points. This ensures that your map only includes what’s necessary.
- Know what you want the process to achieve.
- Only map processes that have a transparent and measurable outcome.
- Begin with the expected result and work the steps in reverse
- Keep the subprocesses easy to follow
- Neither include too many nor too few details
- Ensure shared understanding by using the standard symbols only
- Involve everyone responsible for the process
- Include more than one way to reach the goals as options, wherever possible.
- Show how the process works presently and improve from there.
Read Also: The Eisenhower Matrix: Your Complete Guide to Prioritizing To-Do Lists
DeskTrack: The Better Alternative to Streamline Workflows
With DeskTrack’s intuitive project and work management with employee monitoring, streamlining workflows has never been this easy. The best part is that it works in real-time, which means you will get the update of project progress, task status changes, and tasks shifting between workflows exactly as they happen. However, that’s not all, you can even use the user-friendly tool to track employee activity and time to identify how much time they are wasting. Also, need security? Use the screenshot monitoring and DLP features to prevent insider threats. Overall, it’s the only employee productivity monitoring and work management software you will ever need to use.
Frequently Asked Questions (FAQ)
Q. What is Process Mapping?
Ans. Making a process map is to visually blueprint workflows and processes. This is also called a flowchart, workflow diagram, or workflow diagram.
Q. What are the 4 Steps to Map Your Process?
Ans. These are the 6 essential steps.
- Identify the Process
- List the Activities
- Sequence the Steps
- Make a Flowchart
- Finalize & share
- Analyze & Improve
Q. What are the 5 Levels of Process Mapping?
Ans. This method is split across 5 levels in sequence:
- Category
- Process group
- Process
- Activity
- Task
Q. What are the Three Types of Process Maps?
Ans. Here are the 8 types of process maps.
- Flowchart
- High-Level Map
- Detailed Map
- Swimlane Map
- Value Stream Map
- SIPOC Diagram
- BPMN
- Rendered Map
Q. What are the Process Mapping Tools?
Ans. You can make process maps using:
- Pen and paper
- Whiteboards
- Process mapping software